
Lamination Station - Gluing and Replacing!
Helloooooooo people!
As mentioned earlier, I started this restoration project several
times within the past 6 months, but I would always work on it for a few
hours and then put it aside; but that was the old Cpt. John! The new
Cpt. John is ready to marry fresh, new, clear Western red cedar pieces
onto the boat in order to replace the old rotted ones. This has been a difficult process, but I do feel that for first time lamination work, I have been doing alright!
Since I am not making full sections for replacement, I need to gauge the exact shape of the replacement piece as best as I can in order to avoid as much shaping and sanding as possible after it is attached. This is because once the new piece gets epoxied and drilled into the boat, all I can do at that point is sand the piece down to make it flush with the rest of that part of the boat. So, the less sanding, the better.
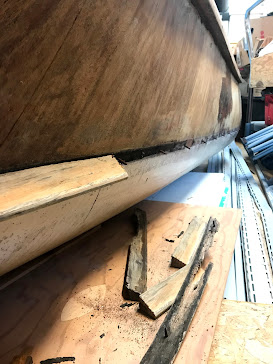
Below we see the first piece installed on the middle right side of the exterior. This was done prior to the Genius Hour Project, but I am providing this as a visual to give you all an idea of what I am planning to do on another part of the boat (and I am really proud of this, so I really wanted to include it!). We are getting ready to marry another piece of fresh new wood on the boat! We are going to be applying the same technique we did here...

To the section of the boat below (back left exterior)...

Once the glue dries, I then move on to the planing and shaping stage. Once I feel the laminated piece is to the right size and shape, I then apply a scarf joint, epoxy the surface that will make contact with the boat, and then screw the new piece in order to securely fasten it to the boat. One thing that is new for this upcoming piece is that I will be working with the West Systems Epoxy kit in order to have both epoxy and fasteners (screws) securing the new piece of wood to the boat.
Some challenges I faced was underestimating how fast the glue begins to dry. The best way to combat this, is to ensure that you have all of your materials ready to go, and that you review the plan enough times so that you are comfortable executing the task. It is also very important to have a cleared work space so you do not need to worry about tripping over extension chords or glue going all over your tools and supplies (I learned this the hard way lol).
Another challenge is to ensure you HAVE ENOUGH CLAMPS for the piece you are working on! Looking back, my Project Proposal stated to have around six wood clamps for the project, but I ended up needing to use over 20 clamps for this portion of the restoration. I was lucky and realized I had just enough clamps for this last piece I worked on. The reason for this is to ensure a tight squeeze on the laminations so there are no gaps in between the strips you are gluing together. If there are gaps, the strength of the piece weakens, and it presents a spot for water to sit in and lead to rot.
Lastly, if we look at the first photo in this post, we can see that I am going to need to fill in the seem that did not sit flush at the scarf joints! Initially, I was devastated from seeing this, however, I reminded myself that this was my first boat restoration project and that I can learn from my mistakes! Moving forward I will make sure to check the fit more frequently and drill the piece with only a few fasteners to start rather than all of them for a full commitment. By doing this I can see how the piece will sit once fastened and then from there decide if it needs to come out and be reshaped slightly.
Until next time,
Cpt. John (not a real captain) signing off!
Comments
Post a Comment